When your x86 computer first starts up, it’s in a surprisingly primitive state:
- No operating system - Obviously, since we haven’t loaded one yet
- No memory management - No virtual memory, no protection between processes
- No file system - Can’t open files, no directories, no abstraction layer
- No network stack - No TCP/IP, no internet connectivity
- No device drivers - No USB drivers, no graphics drivers, nothing
What Services Are Available at Boot Time?
Despite the barren landscape, the BIOS (Basic Input/Output System) gives us a few essential tools:
1. Real Mode (16-bit)
The processor starts in “real mode,” a compatibility mode that mimics the original 8086 processor from 1978. This means:
16-bit registers and instructions Direct access to the first 1MB of memory Segmented memory model (remember those segment:offset addresses?) No memory protection—we can access any memory location
2. BIOS Interrupts
The BIOS provides a set of software interrupts—essentially function calls that handle basic hardware operations:
; Print a character to screen
mov ah, 0x0E    ; Teletype function
mov al, 'H'     ; Character to print
int 0x10        ; Call BIOS video interrupt

; Read from disk
mov ah, 0x02    ; Read sectors function
mov al, 1       ; Number of sectors to read
int 0x13        ; Call BIOS disk interrupt
3. Basic Hardware Access
We have direct access to:
- VGA text buffer at memory address 0xB8000
- I/O ports for communicating with hardware
- Timer and keyboard through BIOS interrupts
- Floppy and hard disk access (though limited)
4. 512 Bytes of Code Space
Your bootloader gets exactly 512 bytes—that’s it. The last two bytes must be the boot signature 0x55AA, leaving you with 510 bytes for actual code. For perspective, this blog post is already several kilobytes!
The Memory Map
When your bootloader starts, the memory layout looks like this:
0x00000 - 0x003FF: Interrupt Vector Table (BIOS interrupts)
0x00400 - 0x004FF: BIOS Data Area
0x00500 - 0x07BFF: Free conventional memory (about 30KB)
0x07C00 - 0x07DFF: Your bootloader lives here! (512 bytes)
0x07E00 - 0x9FFFF: Free conventional memory (about 600KB)
0xA0000 - 0xBFFFF: Video memory
0xC0000 - 0xFFFFF: BIOS ROM and system ROM
What This Means for Us
This primitive environment is both limiting and liberating:
The Constraints:
- Every byte counts in your 512-byte budget
- No standard library—want to print text? You write the code
- No error handling safety net—one wrong memory access and you crash
- Assembly language only (well, you could compile C, but good luck fitting it in 512 bytes)
The Freedom:
- Complete control over the hardware
- No abstraction layers slowing you down
- Direct memory access to anywhere in the first megabyte
- You’re the first code to run—you set the rules
Why BIOS Services Exist?
1. Hardware Abstraction
- Reason: In the early 1980s, different vendors made their own variants of keyboards, displays, disks, and peripherals. Writing software that directly hit I/O ports meant every program would need a separate version for each hardware model.
- BIOS solution: Provide a consistent set of software interrupts (INT xx) that abstract hardware details. For example:
INT 10h(video) lets you print characters or move the cursor without caring if the machine has CGA, MDA, or later VGA.INT 13h(disk) lets you read sectors without knowing if the disk controller is an XT, AT, or SCSI.
2. Bootstrapping
Reason: At power-on, the CPU starts in a minimal state (real mode, no OS, no drivers). There must be some “first code” available to load the operating system.
BIOS solution: Lives in ROM, so it’s always present. It initializes the hardware to a usable state, and exposes just enough functions (disk read, video output) to let a boot sector load the next stage.
3. Uniform Programming Model
Reason: Early software (like DOS, or even bootloaders) shouldn’t need to know hardware timing quirks, sector translation schemes, or different video memory layouts.
BIOS solution: Offers a stable interface across generations. A program written for the IBM PC in 1981 could still run years later on a 486 because the BIOS kept compatibility with the same INT calls.
4. Reduced Complexity in Small Programs
Reason: Bootloaders and diagnostic tools have size constraints (like the 446-byte MBR). Reimplementing low-level drivers inside such tiny programs is impractical.
BIOS solution: Offload those duties to ROM. The boot sector just calls INT 13h to read sectors instead of re-implementing a floppy/hard disk driver in 200 bytes.
5. Portability Across Peripherals
Reason: New hardware (keyboards, disks, graphics cards) could be added without breaking old software. Vendors extended the BIOS to expose functions for their devices.
BIOS solution: As long as the vendor provided BIOS routines, DOS and bootloaders didn’t need to change.
Uses of BIOS Services
- Boot Process – MBR uses
INT 13hto load the VBR/bootloader. - Basic Output – Boot messages (“Missing OS”) via
INT 10h. - Keyboard Input – Get keystrokes with
INT 16hwithout scanning the keyboard matrix. - Timers – Use BIOS tick count (
INT 1Ah) for delays. - Diagnostics – POST routines test RAM, CPU, and peripherals before handing control to user code.
- Fallback for Small Programs – Even today, some boot utilities or OS installers fall back to BIOS INT calls before switching to protected/long mode.
Why OS Boots into Real Mode First
Even back then why was it so important to maintain that backward compatibiltiy when 80286 came not long after 8086? SInce the normal programs have to be migrated anyway when running on 0286 ,due to the virtuak memory, why real mode still exists?
1. Hardware Reset Behavior
- Every Intel x86 CPU since the 8086 (1978) starts in real mode after reset.
- That’s not just a design choice by operating systems — it’s baked into the silicon.
- At power-on, the CPU initializes its instruction pointer (CS:IP = FFFF:0000 on 8086, later 0xFFFFFFF0 on 386+) and executes in real mode.
So: OS doesn’t choose to start in real mode. The CPU gives you real mode, and you have to transition to protected/long mode yourself.
2. Backward Compatibility for Boot Code
- By the time the 80286 arrived (1982), there were already millions of PCs with 8088/8086 chips.
- The IBM PC BIOS and boot sector code were all written assuming 16-bit real mode.
- If Intel had changed the reset mode to protected mode, none of those BIOSes, bootloaders, or DOS programs would have worked.
- Vendors wanted to keep using the same BIOS ROMs, same boot disks, and same operating systems across 8086 → 286 → 386.
Maintaining compatibility meant any 8086 software (like DOS, or bootloaders) still ran on newer CPUs.
3. BIOS and Early Boot Environment
- BIOS itself is written in 16-bit real mode code.
- All BIOS services (INT 10h, 13h, 16h, etc.) assume a real-mode environment.
- Before you can even load your OS kernel, you need BIOS to read from disk, show text, and accept keyboard input. That forces early boot to happen in real mode.
4. The 80286 “Protected Mode Problem”
- The 286 introduced protected mode, but with serious limitations:
- No way to easily switch back to real mode (you had to reset the CPU).
- Segment limits were awkward; no flat memory model yet.
- That made it impractical to just “live” in protected mode all the time in the early OSes. DOS and BIOS had to stay in real mode.
- It wasn’t until the 80386 (1985) with its 32-bit protected mode and paging that operating systems like Linux/Windows could truly ditch real mode for runtime. But even then, they still had to start in real mode for BIOS and boot compatibility.
5. Migration vs. Bootstrapping
- Programs needed to be rewritten for 286+ to use virtual memory and protected mode features.
- But the boot path (BIOS → boot sector → loader) still had to work the same everywhere.
- So Intel made sure: “every chip boots in real mode, just like an 8086.” That way, the very first instructions are universal across generations.
Hello World Program in x86 Assembly Using BIOS Services
BITS 16
ORG 0x7C00          ; BIOS loads us here

start:
    ; Set up segment registers safely
    xor ax, ax       ; AX = 0
    mov ds, ax
    mov es, ax
    mov ss, ax
    mov sp, 0x7C00   ; stack just below our code

    mov si, msg      ; DS:SI points to string

print_loop:
    lodsb            ; AL = [SI], SI++
    cmp al, 0
    je done
    mov ah, 0x0E     ; BIOS teletype function
    int 0x10         ; print AL to screen
    jmp print_loop

done:
    jmp $            ; hang forever

msg db "Hello, World!", 0

; --- Boot sector padding and signature ---
times 510-($-$$) db 0
dw 0xAA55
Why this works
- BIOS loads the first sector (512 bytes) of the boot device at
0x7C00and jumps there. - We initialize DS/ES/SS to 0 and SP near
0x7C00for a valid stack. - The loop walks the string msg character by character, printing each via BIOS INT 10h, function 0Eh.
times 510-($-$$)db 0 pads to 510 bytes.dw 0xAA55is the boot signature the BIOS checks.
Hello World using direct VGA text memory writes (Memory Mapped I/O)
BITS 16
ORG 0x7C00

start:
    ; Set up segment registers
    xor ax, ax
    mov ds, ax
    mov es, ax
    mov ss, ax
    mov sp, 0x7C00

    ; Point ES:DI to VGA text buffer at 0xB8000
    mov ax, 0xB800
    mov es, ax
    xor di, di          ; offset 0

    mov si, msg

print_loop:
    lodsb               ; AL = [SI], SI++
    cmp al, 0
    je done

    mov ah, 0x0F        ; attribute byte: white on black
    stosw               ; write AX to ES:DI (char + attr), DI += 2
    jmp print_loop

done:
    jmp $               ; hang forever

msg db "Hello, World! (VRAM)", 0

; --- Boot sector padding and signature ---
times 510-($-$$) db 0
dw 0xAA55
Running the Boot Sector Program
Let’s now see how to actually assemble and run the Hello World boot sector on your own system.
Step 1. Assemble the Code
We use NASM (Netwide Assembler) to convert our assembly source into a raw binary image:
nasm -f bin boot.asm -o boot.bin
nasm→ The assembler tool.-f bin→ Output format is flat binary (no ELF/COFF headers, just raw bytes). Perfect for boot sectors since the BIOS just loads 512 bytes directly into memory.boot.asm→ Your source file containing the bootloader code.-o boot.bin→ Output file will be a 512-byte binary image.
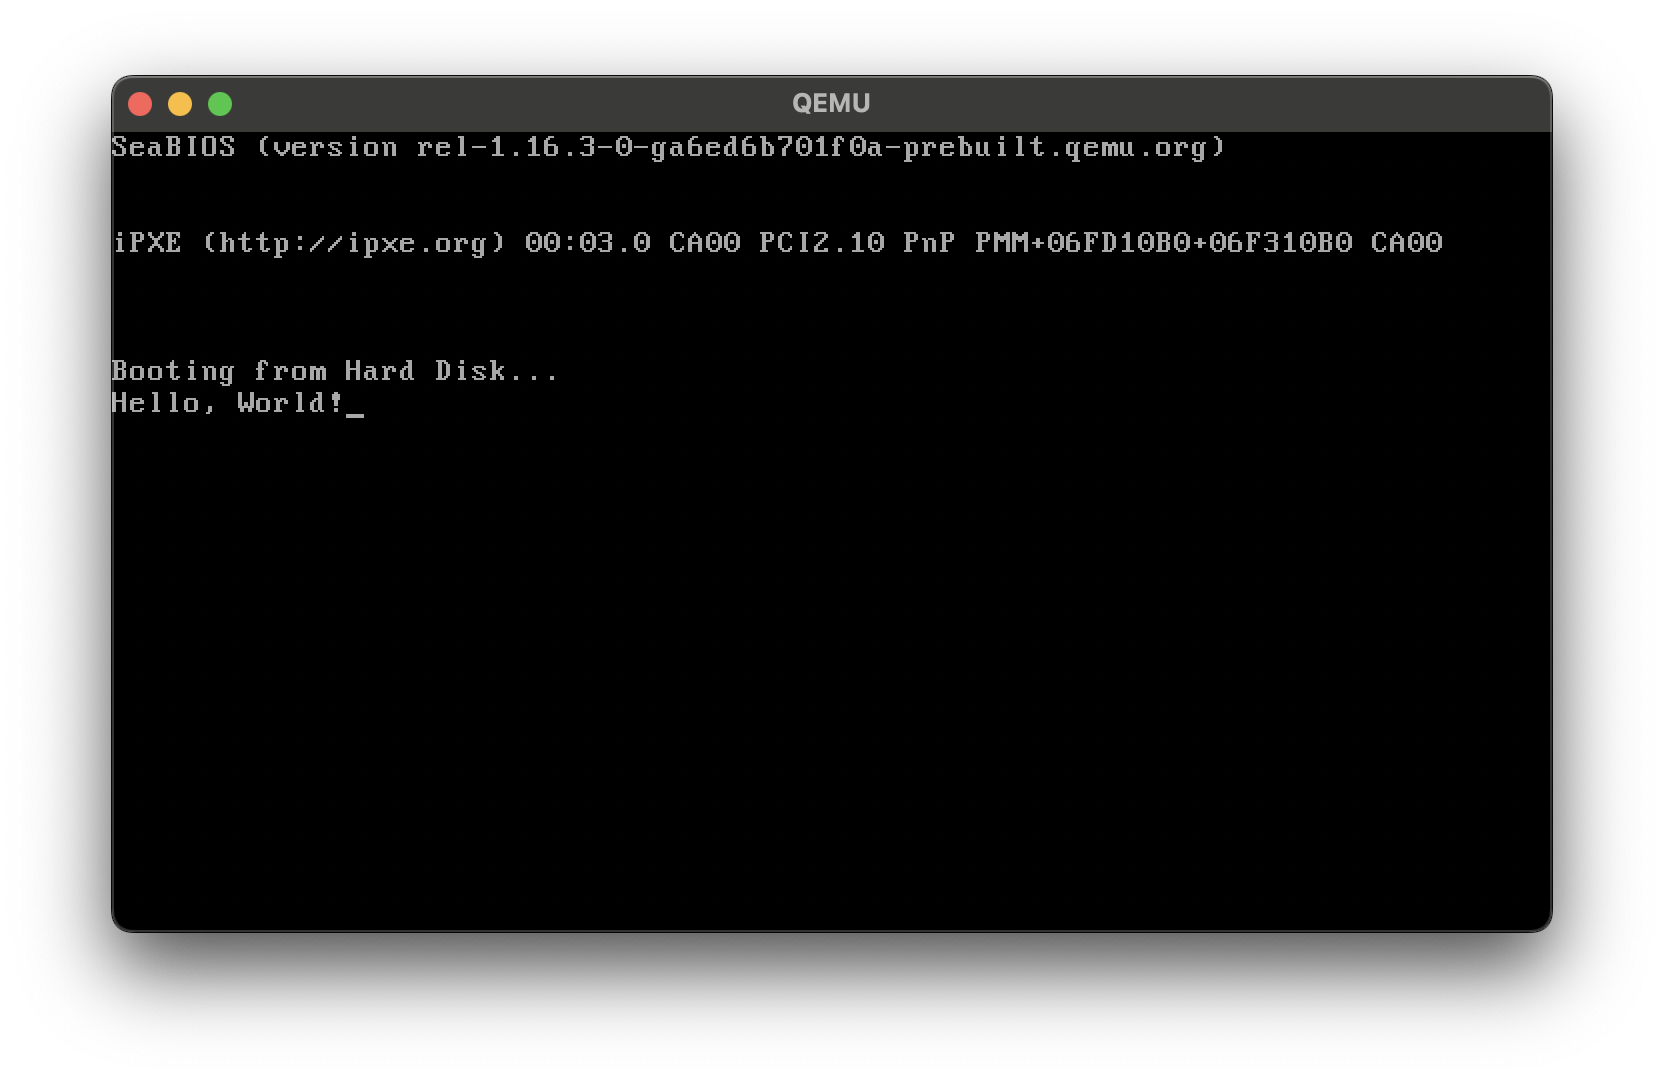
Step 2. Run in QEMU
We’ll use QEMU, a popular emulator, to test the binary safely (no need to risk your actual hard drive):
qemu-system-x86_64 -drive format=raw,file=boot.bin
qemu-system-x86_64→ Launches the QEMU emulator in x86-64 mode.-drive format=raw,file=boot.bin→ Tells QEMU to treat boot.bin as a raw disk image and boot from it.
When executed, QEMU will emulate the BIOS loading your boot sector into memory at 0x7C00 and running it. You’ll see the “Hello World” message printed to the virtual screen.
Step 3. (Optional) Inspect the Binary
To check that the boot sector is exactly 512 bytes and ends with the 0x55AA boot signature:
❯ hexdump -C boot.bin | tail
00000000  31 c0 8e d8 8e c0 8e d0  bc 00 7c be 1b 7c ac 3c  |1.........|..|.<|
00000010  00 74 06 b4 0e cd 10 eb  f5 eb fe 48 65 6c 6c 6f  |.t.........Hello|
00000020  2c 20 57 6f 72 6c 64 21  00 00 00 00 00 00 00 00  |, World!........|
00000030  00 00 00 00 00 00 00 00  00 00 00 00 00 00 00 00  |................|
*
000001f0  00
We can see the last two bytes 55 aa at the bottom.